

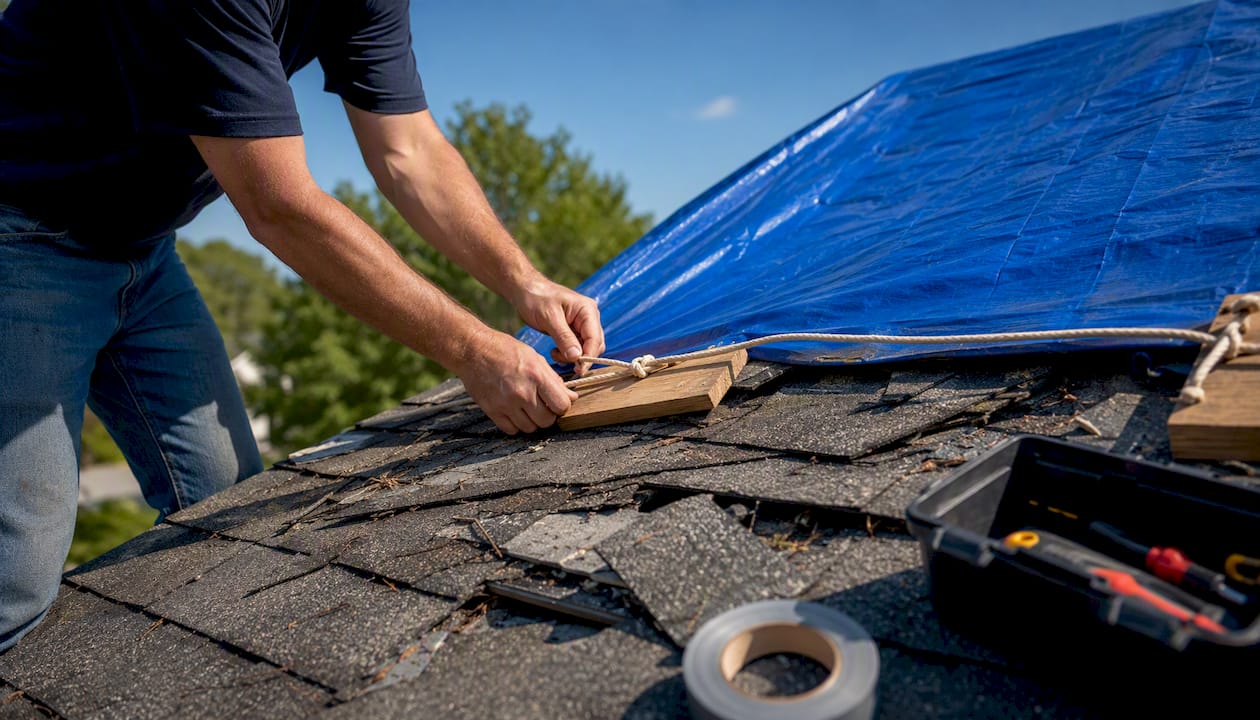
If water is coming through your roof right now, take these three actions immediately: protect people and isolate electrics if safe, catch and divert the water inside, then apply a temporary barrier only when conditions allow.
- Move valuables, furniture and rugs away from the affected area at once.
- Place buckets under active drips and lay heavy-duty plastic sheeting in the attic, sloped toward a container.
- Switch off electricity to affected rooms at the fuse board only if you can do so safely and without entering a flooded area.
- If the ceiling is bulging, poke a small relief hole at the lowest point to release water in a controlled stream rather than risk a sudden collapse.
- Secure a heavy-duty tarp over the damaged section of roof only on a dry, calm day with a low-pitch roof and a safe ladder setup.
Pro Tip: Every measure described in this guide buys you time. None of them replace a permanent repair. A temporary roof repair applied correctly can prevent thousands of euro in interior damage, but it has a lifespan — typically 30–90 days — so book a professional as soon as the immediate emergency is under control.
Key takeaways
A roof leak temporary fix buys you 30–90 days at most — use that window to arrange a permanent repair before trapped moisture causes structural damage.
| Point | Details |
|---|---|
| Inside-first is always safest | Contain water with plastic sheeting and buckets before attempting any roof access. |
| Trace the leak in the attic | Follow the wet trail upstream toward the ridge — the ceiling drip is rarely directly below the breach. |
| Tarp lifespan is 30–90 days | Standard tarps last 30–90 days; heavy-duty reinforced tarps with anchor boards can reach 90 days or more. |
| Document everything for insurance | Timestamped photos and receipts for emergency materials support your claim and protect you if repair is delayed. |
| Workily for fast professional help | Use Ask a Pro for immediate triage advice or book a same-day emergency roofer instantly through Workily. |
Table of Contents
- What to do inside first when the roof is leaking
- How to trace where water is actually entering
- How to tarp a roof correctly when it is safe to do so
- Quick exterior patches and emergency products you can use
- Safety rules and when you must call a professional
- How long will a temporary fix actually last?
- How to arrange emergency roofing help quickly
- Workily gets you emergency roofing help without the wait
- Sources
What to do inside first when the roof is leaking
The safest place to start is indoors. Roof access during a storm, at night, or on a wet surface is genuinely dangerous, and interior containment alone can prevent the worst of the damage while you wait for conditions to improve or a roofer to arrive.
Start with electricity. If water is near a light fitting, socket or consumer unit, isolate power to that circuit at the fuse board before anything else. Do not touch switches or fittings that are already wet.
Once the electrical risk is managed, head to the attic with a torch. Lay heavy-duty plastic sheeting across the insulation beneath the wet area and shape it so water runs toward a bucket or large container rather than pooling. This single step protects the ceiling below and the insulation itself. Inside containment using sloped plastic sheeting into a bucket is the recommended immediate step when roof access is unsafe, and it also reduces the risk of mould developing in saturated insulation.
If the ceiling below is visibly sagging or a bubble of water has formed, poke a small hole at the lowest point with a screwdriver. It sounds counterintuitive, but a controlled drip is far better than an uncontrolled ceiling collapse that soaks everything beneath it.
Document everything before you start mopping up. Photograph the wet ceiling, the attic, any damaged contents, and the roof from ground level if safe. Insurers commonly accept emergency protective measures like tarping, but they expect timestamped evidence of both the damage and the steps you took. Keep all receipts for materials and any emergency call-out fees.
After the immediate containment is in place, run box fans and open windows if the weather allows. If saturation is significant, a dehumidifier hired from a local tool hire company in Cork, Dublin or Galway will pull moisture from the structure far faster than ventilation alone.
How to trace where water is actually entering
The drip you see on the ceiling is almost never directly below the breach. Water enters through a gap, travels along a rafter or roof batten, and drips at the lowest point it reaches — which can be a metre or more from the actual entry point.
Follow the wet trail in the attic upstream toward the ridge to find where water is actually getting in. Shine a torch along the underside of the roof deck and look for a glistening wet line running up toward the apex. The entry point is usually at the top of that trail.
Common failure points to check, in order of likelihood:
- Flashing around chimneys, skylights and soil pipes — flashing lifts, corrodes or loses its seal over time and is the single most frequent source of leaks in Irish homes.
- Pipe boots and vent collars — the rubber or lead collar around any pipe penetrating the roof degrades and cracks.
- Ridge caps — the mortar or capping tiles at the apex of a pitched roof are exposed to wind and frost and work loose over years.
- Valleys — where two roof planes meet, debris accumulates and water can back up under the tiles.
- Lifted or cracked slates and tiles — often visible from the attic as a patch of daylight.
Once you have identified the probable entry point, mark its approximate position relative to a chimney, ridge or gable so you can guide tarp placement or an exterior patch accurately. A piece of chalk on the rafter works well.
How to tarp a roof correctly when it is safe to do so
Tarping is the most effective quick roof leak solution available to a homeowner after storm damage, and when done properly it can prevent thousands of euro in interior damage. The key word is properly.
When to tarp and when to stay off the roof
Tarp only when all of the following are true: the roof pitch is low to moderate, the surface is dry, wind is calm, you have a second person to hold the ladder, and you have appropriate footwear and a fall-arrest harness or roof hook. If any of those conditions are not met, stay inside and focus on containment.
Step-by-step tarp installation
- Measure the damaged area from the ground or attic and add at least 1.2 m (4 ft) on every side, including over the ridge if the damage is near the apex.
- Choose a heavy-duty reinforced polyethylene tarp — minimum 6 mil thickness for short-term use; 10–12 mil for anything expected to last beyond a few weeks.
- Clear loose debris from the roof surface before laying the tarp. Broken tiles or branches will puncture it from beneath.
- Lay the tarp so it extends well past the damaged area on all sides and drapes over the ridge by at least 300 mm (12 in) if the damage is near the top.
- Attach anchor boards (lengths of 50 × 100 mm timber) along each edge of the tarp. Fold the tarp edge over the board, then drive 65 mm decking screws through the board and tarp into the roof decking at approximately 400 mm (16 in) centres.
- Smooth out all folds and low spots — any pocket that holds water will accelerate UV degradation and add weight that shifts the tarp.
- Check after the first rainfall and weekly thereafter. Reposition any shifted boards and clear any pooled water.
Materials you will need:
- Heavy-duty reinforced polyethylene tarp (sized to cover damage plus 1.2 m overhang on all sides)
- 50 × 100 mm timber anchor boards
- 65 mm decking screws
- Cordless drill or screwdriver
- Utility knife
- Sandbags or ratchet straps as secondary anchors on exposed edges
Pro Tip: Avoid using temporary adhesive tapes or spray foam to hold a tarp in place. They trap moisture beneath the tarp, accelerate deck rot, and make the permanent repair harder and more expensive.
Quick exterior patches and emergency products you can use
When roof access is safe and the damaged area is small, a targeted patch can be more effective than a full tarp. Three options are worth knowing.
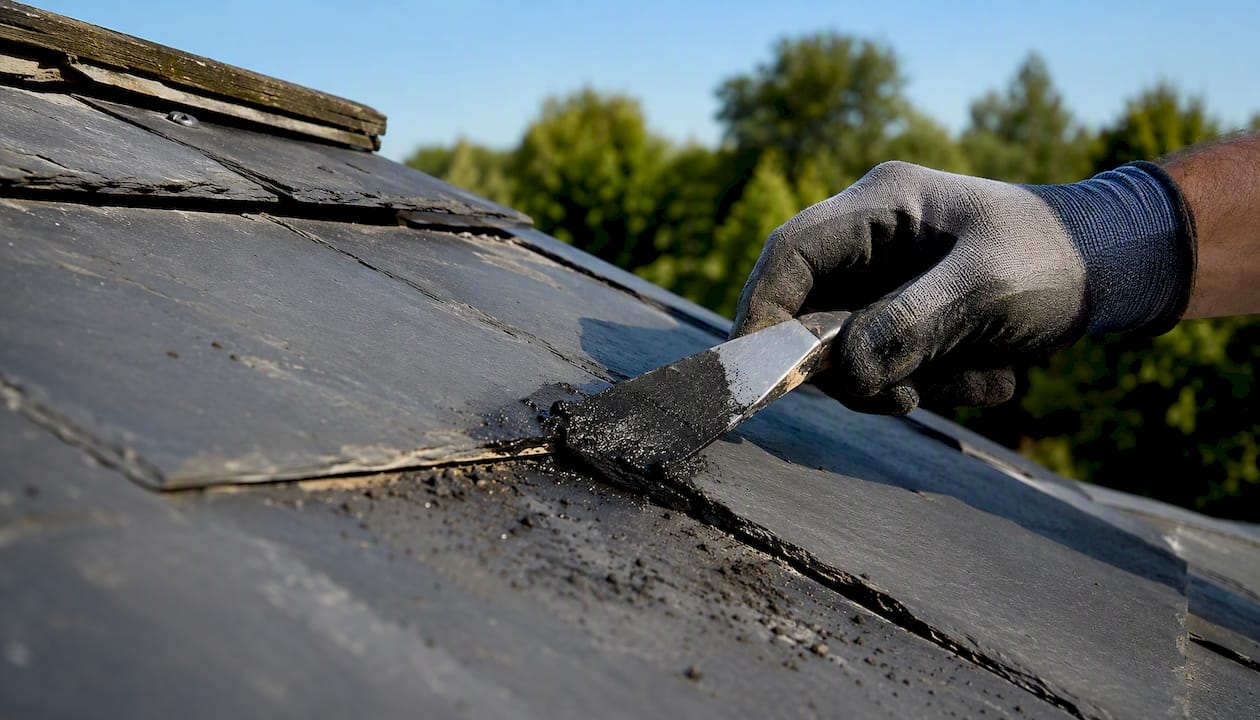
Asphalt roofing cement is the right tool for small holes, cracked flashing joints and lifted slates or tiles. Clean the surface thoroughly, press the lifted material into a generous but feathered bed of cement, and smooth the edges so water cannot pool behind it. Over-application is a common mistake: a thick blob traps moisture and can cause the surrounding material to lift further. Applied correctly, roofing cement can hold for several weeks to months as a temporary measure.
Self-adhering modified bitumen membrane patches (often sold as ice-and-water shield) are the best homeowner-accessible option for larger damaged areas. Cut the patch so it extends at least 100 mm (4 in) beyond the damaged area in every direction, tuck it under the surrounding shingles or slates where possible, and press firmly across the entire surface to form a full bond. The surface must be clean and dry for the adhesive to grip.
Emergency liquid coatings such as Britannia Aquashield are solvent-based, single-pack products designed for external use in adverse conditions. The manufacturer describes Aquashield as a temporary waterproofing solution. It can be brushed over cracked flashings, felt tears or small gaps as a stopgap. As with all products in this category, manufacturer datasheets are explicit that emergency coatings must be followed by a full system inspection and permanent repair — they are not a substitute for one.
One product category to avoid: consumer aerosol sprays marketed for roof repair. They provide surface coverage only, do not bond reliably to asphalt shingles or natural slates, and can give a false sense of security that delays a proper fix.
Safety rules and when you must call a professional
Non-negotiable safety rules
- Never climb a wet, icy, moss-covered or wind-swept roof under any circumstances.
- Always use a properly footed ladder with a second person present to stabilise it.
- Wear non-slip footwear and, for any roof work above single-storey height, a fall-arrest harness anchored to a ridge hook.
- Never work on a roof after dark or during a storm.
- Keep children and pets well away from the work area.
Red flags that mean you stop and call a professional
If you see any of the following, do not attempt a DIY fix. Go inside, contain what you can, and call an emergency roofer or use Workily’s roof leak emergency guide to find a verified pro near you.
- Structural sagging or a soft, spongy feel underfoot on the roof deck
- Multiple leak points appearing simultaneously
- Large punctures or sections of missing roofing material
- Any leak near an electrical fitting, consumer unit or solar panel installation
- Visible rot or delamination of the roof decking
- Storm damage covering more than a few square metres
When calling an emergency roofer, tell them: your location (county and nearest town), the roof type (pitched slate, flat felt, single-ply membrane), what you can see from the attic, whether the leak is active, and any access constraints. A short video clip from the attic sent via WhatsApp can cut triage time significantly.
How long will a temporary fix actually last?
Realistic expectations matter here. A temporary measure applied in a hurry during a storm is not the same as one installed carefully on a dry day.
| Temporary measure | Expected service life | Key limiting factors |
|---|---|---|
| Standard polyethylene tarp (6 mil) | 30–90 days | UV degradation, wind uplift, pooling |
| Heavy-duty reinforced tarp with anchor boards | Up to 90 days, sometimes longer | Fastening quality, rainfall frequency |
| Asphalt roofing cement patch | 4–12 weeks | Surface prep, temperature cycling |
| Self-adhering membrane patch | several weeks to months | Bond quality, foot traffic |
| Emergency liquid coating (e.g. Aquashield) | Manufacturer-specified; treat as short-term | Substrate condition, exposure |
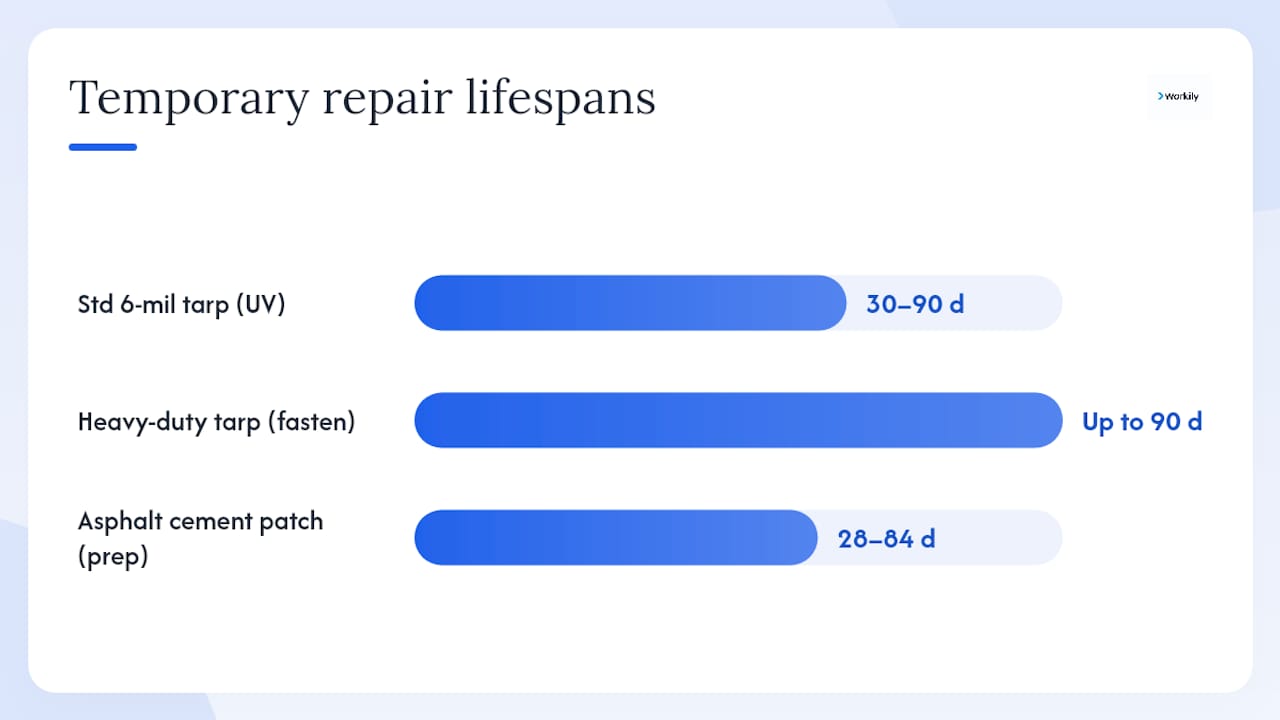
Tarping is an emergency measure that typically lasts 30–90 days; heavy-duty reinforced tarps with anchor boards can last longer when well secured. Factors that shorten any temporary fix include prolonged UV exposure, high winds, water pooling in folds, and foot traffic over the repair.
A properly installed tarp should extend at least 1.2 m (4 ft) beyond the damaged area and be smoothed to eliminate pockets. Inspect it after every rainfall and at least once a week. If you see shifting boards, pooled water or tears, address them immediately — a failed tarp that goes unnoticed for two weeks can cause more damage than the original leak.
Materials and tools checklist for a roof leak emergency
Inside-first kit (always have these ready):
- Large buckets and shallow trays
- Heavy-duty plastic sheeting (at least 100 micron / 400 gauge)
- Gaffer tape or duct tape to seal sheeting joins
- Torch or head torch
- Old towels and a wet-dry vacuum if available
- Box fans or a hired dehumidifier
Exterior kit (for safe, dry conditions only):
- Heavy-duty reinforced polyethylene tarp (sized generously)
- 50 × 100 mm timber anchor boards
- 65 mm decking screws and cordless drill
- Utility knife
- Asphalt roofing cement and a stiff putty knife
- Self-adhering modified bitumen membrane patches
- Waterproof roofing tape (butyl-backed)
- Nitrile gloves and safety glasses
Most of these materials are stocked by Woodies, Chadwicks and larger Screwfix branches across Ireland. For emergency supply outside business hours, a 24-hour builders’ merchant or a local roofing supplier in Dublin, Cork or Limerick will often hold stock. If you need a professional to bring materials and do the work, book a same-day emergency repair through Workily rather than waiting for a standard call-out.
How to arrange emergency roofing help quickly
Speed matters when a leak is active. The faster you can give a roofer the right information, the faster they can arrive with the correct materials.
Tell the roofer or emergency tarping service:
- Your exact location (county, town, Eircode if you have it)
- Roof type and approximate age
- What you can see from the attic (wet rafters, daylight, extent of wet area)
- Whether the leak is currently active
- Any access constraints (steep driveway, no parking, scaffolding needed)
Prepare a short video from inside the attic and a photo of the roof from ground level before you call. Contractors who can see the damage before arriving can bring the right materials and give you a more accurate quote on the spot.
If you are unsure whether the damage warrants an emergency call-out or whether a DIY patch is appropriate, Workily’s Ask a Pro video consultation connects you with a verified roofing professional in minutes. You describe what you are seeing, share your photos or video, and get immediate triage advice without waiting for a site visit. For homeowners in Dublin, Cork, Galway or anywhere else in Ireland, this is often the fastest way to know whether to attempt a temporary fix yourself or wait for a professional.
Once you have triage advice, you can compare quotes from local roofers and book instantly through Workily, with verified reviews and secure payment built in.
An honest view on DIY temporary fixes
There is a version of this conversation that goes: “Just tarp it and you’ll be fine.” That is true in a narrow set of circumstances — a small, clearly located breach on a low-pitch roof, dry calm weather, a competent person with the right equipment and a second pair of hands. In those conditions, a well-applied tarp or membrane patch is a genuinely sensible stopgap.
The version nobody talks about enough is what happens when a temporary fix is applied badly or left too long. Trapped moisture under a poorly sealed patch accelerates deck rot at a rate that can turn a €400 repair into a €4,000 one. A tarp that shifts in the first storm and goes unchecked for a fortnight can cause more water ingress than the original breach. And if a permanent repair is delayed beyond the point where the insurer considers it reasonable, the claim can be reduced or refused.
The practical rule: inside-first containment and small exterior patches on accessible, low-pitch roofs are reasonable for a competent homeowner. Anything involving structural sagging, large-scale storm damage, multiple leak points, or a roof steeper than about 30 degrees should be left to a professional from the start. The temporary measure in those cases is interior containment, documentation, and a same-day call to a verified roofer.
Getting multiple quotes before committing to a full repair is also worth doing. Prices for emergency roofing work in Ireland vary considerably, and Workily makes it straightforward to compare verified local professionals without the usual phone-around.
Workily gets you emergency roofing help without the wait
When a roof leak hits, the last thing you need is to spend an hour ringing around for a roofer who may or may not show up. Workily connects Irish homeowners and property managers with vetted, reviewed roofing professionals who offer same-day emergency visits across Dublin, Cork, Galway, Limerick and beyond.

Start with an Ask a Pro video consultation if you are unsure what you are dealing with. A verified roofing professional will review your photos or video, tell you whether a DIY temporary fix is appropriate, and advise on what a roofer will need when they arrive. If you are ready to book, instant booking through Workily puts you in front of available local pros in minutes, with transparent quotes, verified credentials, and secure payment. No chasing, no uncertainty about who is turning up. Workily’s trust and safety process vets every professional on the platform before they take a booking.
Sources
- How to Apply Emergency Roof Tarp
- Britannia Aquashield emergency leak repair product listing
- How to temporarily stop a roof leak until you can get it fixed
- How to temporarily fix a roof leak before it gets worse
- How to temporarily stop a roof leak from inside